


An Easy Guide to Fishing Knots
 An Easy Guide to Fishing Knots
gearweare.net
An Easy Guide to Fishing Knots
gearweare.net
When it comes to having a prosperous fishing trip, there is an unsung hero that is vital to your success. Receiving little to no attention for its importance, fishing knots are an essential skill that all anglers must have to reap the rewards of angling. Tying an effective fishing knot is critical to keeping your lures on your line and successfully reeling in your catch.
Should one decide to skimp on the significance of this skill, the results could be costly and frustrating.
Without the proper skills to tie an effective fishing knot, all the expensive and fancy gear in the world will be of no use if your knot slips or breaks and your lure falls to the bottom of the lake, or the fish swims away with your gear. Take the time to learn these tested knots and incorporate them into your fishing game.
While there are too many to knot options to cover in one place, this Easy Guide to Fishing Knots will walk you through the most common, simple, and effective knots that will allow you to enjoy the sport from step one to reeling in the big one.
Since everyone learns differently, this guide will also provide links for videos for viewing to assist in effectively learning to use these fishing knots.
Table of Contents
The ABCs
When it comes to fishing knots, there are a few basic rules to remember and follow during your excursions. These include:
- Select and utilize the right knot for the right situation. Consider the need, the thickness of the line, and also the material the line is made of.
- Chose a knot that you are comfortable tying and use it until you perfect another alternative.
- Practice makes perfect. Do not wait until you are on the shoreline or adrift on the water before mastering the knots you use. Practice before your fishing trip so that it becomes second nature.
- Lubricate your knots with water or saliva before cinching them down. This reduces the friction on the line. Friction sacrifices the integrity of the line and ultimately can lead to breakage.
- When cutting tag lines (excess line) from the knot, be sure to cut close to the knot, but not too close, which can damage the knot’s integrity.
Arbor Knot

No fishing can be done until your rod and reel are ready for action. The first knot to be used will allow an angler to tie line to the spool of the reel. While this knot is not intended to provide the strength to catch a large fish, it provides the strength to hold during circumstances where some pressure is placed on it.
To begin an Arbor Knot, wrap the line around your spool using the “tag” (tying end of the line). Once around the spool, using that same tag end, tie an overhand knot around the “standing” end, or the part of the line not actively being used to tie the knot.
Finally, using the tag end again, tie another overhand just above the first knot. Once the second knot is completed, pull the standing end to slide both knots towards the spool. Once the knots are jammed together, trim the tag end and voila… the line is attached.
Palomar Knot

One of the most popular knots used in a variety of situations is the Palomar Knot. With its simplicity to tie, and having a reputation for maintain 100 percent of the lines original strength, the Palomar is at the top of the chosen knots for dependability according to Berkley Fishing. It is crucial to remember that the integrity of the knot is dependent upon it being tied correctly.
Start your Palomar Knot by doubling up about six inches of line and running it through the eye of the hook or lure. Allowing the hook to hang to the bottom of the loop, grasp the loop and complete a simple overhead knot around the doubled line near the standing end.
Now, taking the loop in one hand, guide the hook through the loop and draw the line tight… making sure to bring the loop completely over the eyelet. Pull the tag end (hook) tight. Remember, lubricate the knot before cinching by pulling on the tag and standing ends.
Improved Cinch Knot
Another frequently used knot for fishing line is the Improved Cinch Knot. This knot is often the go-to choice for tying fishing line to hooks, lures, and swivels. This option provides a quick, simple knot that has been proven to hold up well. While it is not recommended on using this knot for large weighted line (>25 pound) or braided line, it is a safe option for other monofilament options.
It can be difficult to tie in lines testing greater than 25 pounds breaking strength and is not recommended for braided line.
This simple knot starts with threading the line through the eyelet of the select tackle. Once through, double back and wrap the tag line around the standing line 5 to 6 times. Thread the tag line through the loop that was created just above the eye of the tackle.
Once through the original loop, thread the tag line end through the big loop that was created. Lubricate the knot and pull on the tag end to tighten. Slide the knot against the eye and clip the excess of the tag end.
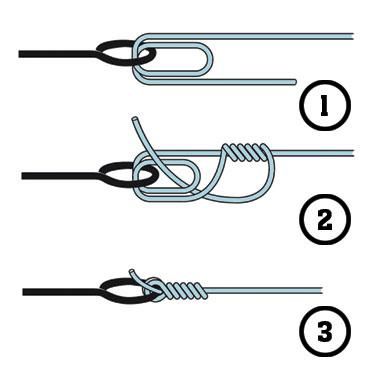
Uni Knot (Hangman’s Knot)
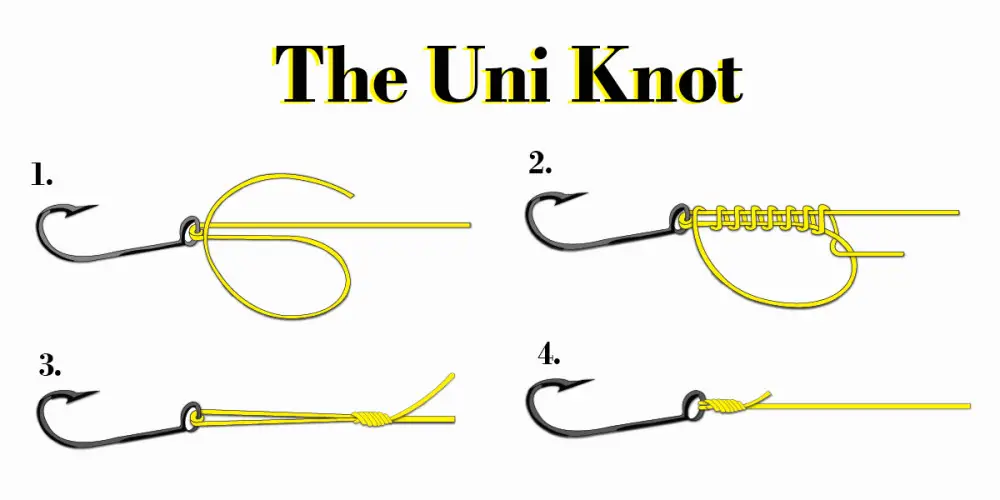
Another handy knot to have in a fishing knot arsenal is the Uni Knot, or sometimes called the Hangman’s Knot. This, too, is used to attach line to tackle. Used for monofilament line, this knot is often found to be the preference to the previously mentioned Improved Cinch Knot. It’s simplicity and durability are why it is often the go-to choice.
To start, thread the line through the eye of the tackle and double back alongside the standing line end. Loop the tag end back over the doubled up standing line, leaving the tag line resting on the doubled standing line. Hold the two intersecting segments of line with your thumb and finger while wrapping the tag line around the double line 6 times, staying inside the created loop.
At the end, bring the end of the tag line back through the loop and pull through to finish; making sure to moisten the knot. Before pulling completely tight, you can choose to leave a “hangman’s” noose at the end, or cinch down for a complete knot.
Trilene Knot
If you are looking for a strong knot, using the Trilene Knot may be a good option. This knot, developed and tested by Berkley Fishing has “yielded 100 percent of the line’s original strength when tested on Berkley’s Knot Wars equipment.” (Berkley Fishing) Berkley Fishing recommends this knot for monofilament lines and for attaching swivels, snaps, lures, and line leaders.
This knot begins by threading the line through the eye of the hook or tackle twice, creating a small loop. After forming the loop, hold it in place by pinching it with your thumb and forefinger, then bring the tag line up to the standing line and wrap it around a minimum of five times. The tag line then is brought back down towards the eye and threaded through the two loops that were created. Again, lubricate the knot and tighten.
Berkley Fishing created a video for tying the Trilene Knot. You can see it here.
Take Your Know on the Go
With so many choices of fishing knots, a quick guide cannot reveal them all. When on the go, know that there are many resources available to learn about additional knots needed for your angling needs. A website, Animated Knots, provides detailed animations for many different styles of fishing knots. There is also a mobile app available to have the information with you while you are on the go.