


Snowshoeing Techniques
 Snowshoeing Techniques
gearweare.net
Snowshoeing Techniques
gearweare.net
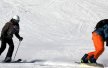
Snowshoeing is quite possibly the simplest winter sport to get into. A common saying within the community is, “If you know how to walk, you know how to snowshoe,” and for the most part this holds true. Covering flat ground where the snow has already been compacted is as simple as putting one foot in front of the other. However, if you want to get off trail, into unbroken snow and up steep slopes, there are a few techniques that you should learn.
Even as you become more advanced at snowshoeing, the learning curve remains easy and approachable. This simplicity does not mean snowshoeing techniques are not important to learn though. As you venture deeper into the backcountry, the possibility of something going wrong increases, and a thorough grasp of how terrain behaves and should be approached is integral to getting home in one piece.
Basis Skills
The most basic snowshoeing techniques should be utilized as soon as you strap them on, no matter what type of terrain you are exploring. Firstly, your stride and your stance both need to be slightly larger than how you typically walk, which helps you avoid stepping on your snowshoes and kicking your shins. However, also make sure your steps aren’t unnecessarily large, as this can cause muscle pain.
The extra width and length that snowshoes add to your feet can also make turning around difficult. There are a few different techniques that are used for turning around:
- Take small steps, walking in a circle until you are facing the direction that you want to be facing. In tight areas, this method isn’t possible.
- Step Turn – Position one foot at 90? in front of the other. Bring the other foot to meet the first, then repeat.
- Kick Turn – Twist one foot so that it is facing behind you, then bring the other foot to meet it. You will now be facing the opposite direction.
The next level of technique comes into play when you begin walking on ground that is covered in untouched snow. Whoever is leading the group has to “break snow” on this type of terrain, compacting the snow and creating a path. This is hard work, so don’t expect to move at your usual pace. To make breaking snow easier, move slowly and conserve energy. If you are in a group, have everyone take turns leading the way so that everyone shares this tough task.
The most common types of snow you may encounter while snowshoeing include:
- Packed/groomed – This is snow that has either been groomed or tracked out by skiers or other snowshoers. It is much easier to walk over than other types of snow.
- Powder – Newly fallen, unbroken snow is called powder. How difficult it is to move through depends on how deep it is, however it will always require much more effort than walking over packed now.
- Crust – Snow forms a crust when the top melts and then refreezes. Crust can be thick or thin. Sometimes it can hold weight, while in other cases it will break when weighted. On thick crust, you should use the teeth in your snowshoes to grip the snow.
When you inevitably fall in powder or crust, you will quickly realize that standing back up isn’t so simple. Pushing off snow for leverage is like using air, and often you’ll just end up burying yourself deeper. In this case you have two options:
- Get on one knee, and placing the other at a 90? in front of you. Place your hands on the knee in front, and push to get up.
- Place your poles next to you, overlapping them in the shape of an x. Put your hands on the spot where the poles meet, and push to stand up.
For the second method you need poles, which are a good idea to have in general. They assist with balance, and make it easier to travel up and down hill.
More Advanced Skills
Moving up and downhill is where snowshoeing technique becomes its most advanced. There are two types of steps that inform the other ways of moving across terrain:
- Stamping – Slowly step forward with heel than toe. Pause before weighting your snowshoe, which compacts it with time and pressure.
- Edging – Same process as stamping, but using the side of your snowshoe and moving laterally.
Both above techniques can be used on flat terrain as well as hills.
When ascending a hill, the method with which you choose to move upwards should be based on the steepness of what you are climbing. On moderate hills, any of the following techniques should work:
- Stepping up – Simply walk upwards, using stamping to create steps in the snow when needed.
- Hellingbone stepping – Similar to stepping up, but feet turn away from body at 45?.
- Scrambling – Fast stepping up with weight concentrated on toes.
On steeper hills, the most stability will be found walking in one of these ways:
- Side stepping – Position your body sideways as you move up hill, edging with the uphill foot and following with the downhill foot.
- Kick stepping – Kick, pause, and stamp the snow as your travel upwards, making sure the snow solidifies. The goal is to create steps.
Some snowshoes are now built will heel lifts. These support your foot as you ascend, and eases strain on ankles and calves.
When descending a hill your body positioning should be stacked, your knees should be bent, and you always want to plant your heels first. Keeping your snowshoes level to the horizon, use one of the following techniques:
- Side stepping – Make sure to keep weight on the hill side, and to step downward far enough to not collapse steps above.
- Glissading – Keep weigh on your heels, and move down a hill quickly, using long strides,
While ascending or descending you want to try to move toward your destination in as straight a line as possible. Sometimes this line is too steep though. In this case, traversing back and forth across the hill will make ascent more approachable. For more details on all of these techniques, Jim Joque has this great guide. Also, make sure to check out this past article on The Basics of Snowshoeing.
Don’t Forget to Be Prepared
There are always dangers when venturing into the backcountry, and winter is an especially hazardous time of the year. Avalanches, tree and rock wells, and the cold require special gear and expertise to be dealt with and, ideally, avoided. Always make sure you know everything you need to know about where you are going. For more information on what can go wrong in the winter, check out my article on Winter Hiking Hazards.