


How to Safely Set Up a Top-rope
 How to Safely Set Up a Top-rope
gearweare.net
How to Safely Set Up a Top-rope
gearweare.net
Top-roping is a common way for people who are new to the sport of climbing to get their hands on some real rock for the first time. 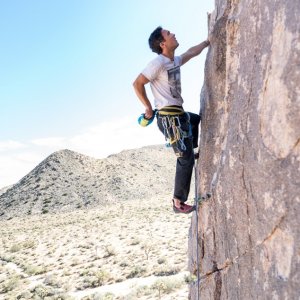 Although ideally the first few times you go outside to top rope will be with a friend who knows the literal ropes and can ensure that everything is done is a safe way, it is still important for you to learn how to properly set up a top rope as well. This will allow you to eventually head to the crag on your own. Furthermore, climbing safely is all about carefully checking everything that is done, with repetition a central tenet of a safe rig. An extra pair of eyes on setup can be a critical factor for ensuring that everything has been done in a safe manner.
There are two ways to access top rope anchors. The first and most common, way that a climber can get to the top of a climb is to lead it. This is done as either a sport climb, where the climber clips bolts to protect themselves as the move upwards or a trad climb, where removable protection, such as Camalots and nuts, are placed into cracks in the rock. If no one in your party has the skills to lead in either of these styles, there are some outdoor areas where the top of a cliff can be accessed by foot. In these areas it is possible to walk to the top of a climb, then send the rope down.
It is important to stay within your skill set and comfort zone as you learn to climb. For this reason, don’t try to lead something without someone there who can walk you through the process. Even if you think you can figure it out, you may be missing something integral which is not a gamble anyone should take when they are 40 feet off the deck.
With all this in mind, here are the ins and outs of setting up a top rope anchor.
Types of Anchor Points
The first key aspect of creating a bomber anchor is to identify some solid anchor points. Sometimes the anchor points you should use will be obvious, such as when there are fixed anchors already installed at the top of a climb. Other times you will have to be more creative, using natural features such as trees or rocks to create your own anchor points. Ideally, every top rope anchor will have a minimum of three anchor points, however, the reality is that this is not always possible or practical. The bare minimum you should have are two anchor points, as this helps to ensure that you won’t fall to your death if one anchor fails.
Here are the most common types of anchor points that you will use when setting up a top rope:
Fixed Anchors – These are artificial gear that has been placed in the rock as points where anchors can be secured. The most common types of fixed anchors is a bolt that has been placed in the rock by drilling a hole. It is also possible for Pitons to be used as fixed anchors, however, this is far less common these days.
Fixed anchors remain where they have been placed after you are done with climbing. Since they are exposed to the elements and the general wear and tear of climbing they must be replaced periodically. For this reason, always inspect fixed anchors before trusting them with your life. In particular, rust and spinning hangers are signs that the bolt needs to be replaced.
Natural Anchors – When there are no fixed anchors at the top of a climb it is possible to use features of the natural environment. Both trees and rocks can make good anchors by slinging them with a cordelette or a strap. When setting up a top rope off of natural features some precautions must be taken depending on the feature though.
 Never, ever use a dead tree to set up a top rope, as these won’t be well-rooted and could be pulled out as you climb. Also, saplings which can be bent or harmed under a climbers weight are a no-go. Instead, stick to well-rooted trees that are at least 12 inches in diameter. Either secure the sling around the tree with a carabiner or a girth-hitch and use a flat, wide sling as this will be less harmful to the tree.
Rock features that can be used as anchor points include horns and chockstones, which are stand-alone stones that have been tightly wedged into a crack. With both of these options, a runner can be looped around and attached to a carabiner. Always closely inspect the rock before using it, looking for any loose rock or areas of potential weakness.
Creating a Top Rope Anchor
There are lots of different ways to create a top rope anchor, but the principles that go into every one are the same. These principles are described by the acronym SERENE, which breaks down as follows:
Solid – The anchors you are using as well as the gear you are attaching to these anchors are all in good condition and extremely unlikely to fail.
Equalized – The cordelette used to attach the anchors to your rope has been rigged so that equal force is exerted on all anchor points.
Redundant – The are multiple anchor points and redundancy is built into all aspects of the anchor, so that if one anchor point were to fail the entire system wouldn’t go with it.
Efficient – Try to keep the anchor system as simple as possible.
No Extension – If one anchor point were to fail an extension of the other point could cause a shock force. Try to avoid this through equalization and the addition of stopper knots.
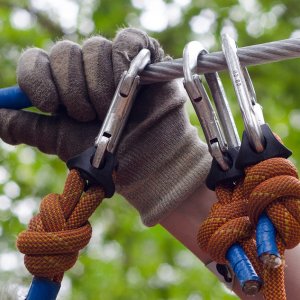
As an example of a good anchor system that follows these principles to the tee is the quad anchor. To create an anchor you will need a 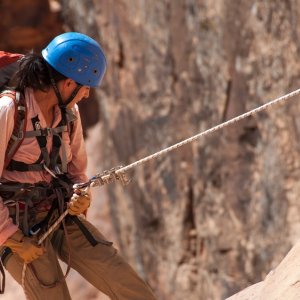 long cordelette tied into a loop using a double fisherman’s knot and four carabiners. Locking carabiners, which cannot open, are safer. Fold the looped cordelette in half, so that there are four parallel strands of rope (hence “quad). Next, tie an overhand knot at each end of the cordelette so that three distinct sections are created. These knots will help to reduce the load on each anchor and ensure that the entire system doesn’t fail if one aspect does.
Clip one carabiner to each end of the double loop so that two strands of rope pass through each and then clip those carabiners to your anchor points. Now it’s time to equalize – you will want the tension on each anchor to be the same. The great thing about this anchor is that is self equalizes, so the biggest thing you will need to make sure is that the cordelette is long enough to prevent the rope and carabiners from rubbing against the rock. Once you have done this, clip two locking carabiners to the middle section between the two knots. Secure each of these carabiners to two different strands of cordelette, which again creates redundancy in the system. For a step by step guide with pictures for creating a quad anchor check out this article in Rock and Ice.
One final consideration of setting up a safe top rope anchor is the angle. The greater the angle of the anchor between the anchor points, the higher the force each anchor point is subjected to will be. Aim for an angle of around 60 degrees, as this will exert a shock force of only about 58% of the original load.